![[KDLP] logo](/images/kdlp_logo.png)
Build, install, and boot the latest Linux kernel fresh off Linus Torvalds’ tree.
Set up a kernel development environment
Get comfortable with building the kernel
Patch 1 adds username/E0.txt modified as described below
Don't forget a cover letter
All patches are expected to pass checkpatch.pl as described in the policies and procedures
Submit your patches to exercise0@COURSE_DOMAIN
IMPORTANT NOTE: Some students have been running into an issue where 30G is insufficient
to compile the kernel with ccache. We apologize for the inconvenience, but it is highly recommended to add an additional
virtual hard drive to your VM and extend the logical volume as described in
this tutorial.
We would recommend adding at least an additional 20G of space, for a total of 50G.
If you run out of disk space in the middle of compilation, you'll almost certainly have to
delete files to free up enough space to resize your filesystem, which would likely
mean running make clean and losing your progress in the compilation.
First, install the requisite dependencies. On Fedora, you can use
sudo dnf builddep kernel
which is roughly equivalent to
sudo dnf -y install gcc flex make bison openssl openssl-devel elfutils-libelf-devel ncurses-devel bc git tar dwarves
It's also recommended to install ccache to speed up subsequent kernel builds by running
sudo dnf -y install ccache
Be sure to restart your terminal after installing ccache so that it gets added to your path!
Clone the v6.11 Linux kernel release from git.kernel.org.
It's recommended to set --depth=1 to minimize the download size.
git clone --depth=1 --branch v6.11 https://git.kernel.org/pub/scm/linux/kernel/git/torvalds/linux.git
When this completes, change the current directory to the kernel tree with
cd linux
Copy the kernel config for your running kernel to your kernel source tree with
cp /boot/config-$(uname -r) .config
and set any new config options to the defaults with
make olddefconfig
Set a custom version tag for your kernel build.
Create a file named localversion in the linux directory and add something cool.
We suggest it begin with a '.' character, and it must NOT contain spaces.
For example, cat localversion might return
.my-cool-kernel-version
which will result in a kernel version like
6.11.0.my-cool-kernel-version
Now, build the kernel by running
make -j $(nproc)
The -j option will invoke a parallel build using the number of threads specified.
The $(nproc) will resolve to the output of the nproc command,
which in turn will return the number of processor cores on your VM.
This will take a while.
Next, install the kernel modules for your newly build kernel onto your system.
The directories you will be writing to are owned by root,
so you need superuser permission (granted by wrapping your command with sudo)
in order to complete this step.
sudo make -j $(nproc) modules_install
Finally, install the new kernel into your system's /boot directory. The same superuser considerations from the previous step apply.
sudo make install
When this completes, shutdown your VM.
sudo shutdown now
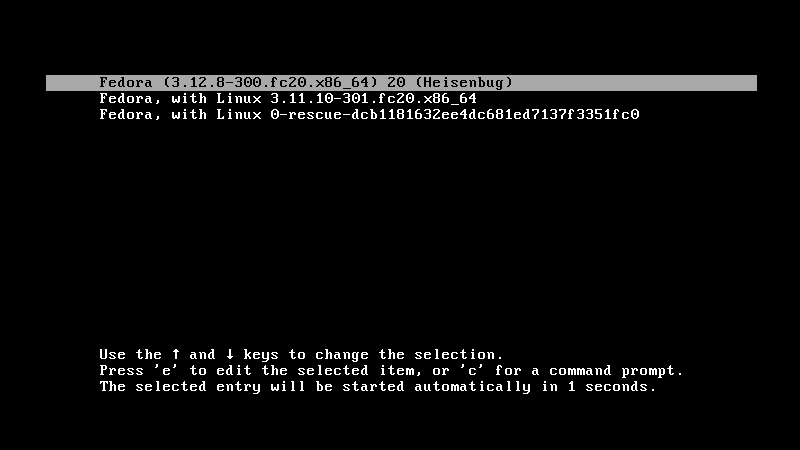
Power on your system again. You should see a menu that looks roughly like the following:

As soon as it appears, hit the down arrow key to stop the countdown that will automatically boot the first selected menu entry in a couple of seconds. Use the arrow keys to select your newly built kernel with your custom tag and hit enter when it is highlighted.
If you would like to set your new kernel as the default (i.e. it will boot automatically without selecting it at the menu), then use the following command to locate the index associated with your new kernel
sudo grubby --info ALL
Then, set the default to the index of your new kernel
sudo grubby --set-default-index <index>
When you have booted into your new kernel and logged in, make a copy of E0.txt
in the yourname/E0 directory and answer the questions inside.
Run the following commands and save their output for the assignment submission.
uname -a

sudo dmesg | head
Note that your editor likely allows you to directly dump the output of these commands into E0.txt.
In nano this is accomplished via ctrl+t, and in vim you would use :r! command.
Generate your patches (don't forget the cover letter!), make sure they pass
checkpatch.pl, and submit to exercise0@COURSE_DOMAIN.
msg = (silence)whoami = Nonesingularity v0.6-4-gbe148cb https://github.com/underground-software/singularity